quinta-feira, 11 de junho de 2020

15 Hidden Android Features You Should Know

While Android has matured by leaps and bounds, it's still going through the refinement phase. Over time, Google has both added and removed many popular features in Android. Sometimes the features are completely removed. However, in many cases, they make it to the Settings page or they are buried under different hidden places inside Android. That's why we have come up with this article where we unearth 15 hidden Android features that are quite interesting and helpful. So, let's go ahead and explore some unique Android features which are available on our Android devices.


Hidden Android Features

Here, we have mentioned several hidden Android features ranging from privacy, security, ease of use and more. Further, we have also added some obscure Android features which were released recently but might have gone under the radar. Now with that said, here are the hidden Android features that you should know and use often.

1. Block Spam Calls

The one feature that I turn on whenever I set up a new Android device is: filter spam calls. It saves me from unwanted calls by telemarketers, fraudsters and spammers. If you use a stock Android device, you must have the Phone app by Google installed as your default dialer. To enable spam call blocking, open the Phone app and tap on the three-dot menu on the top-right corner and open Settings. After that, open "Caller ID and spam" and enable both the toggles. Now, whenever you will receive a call by spammers, the screen won't light up or make any sound. It's almost like DND with Total Silence turned on.
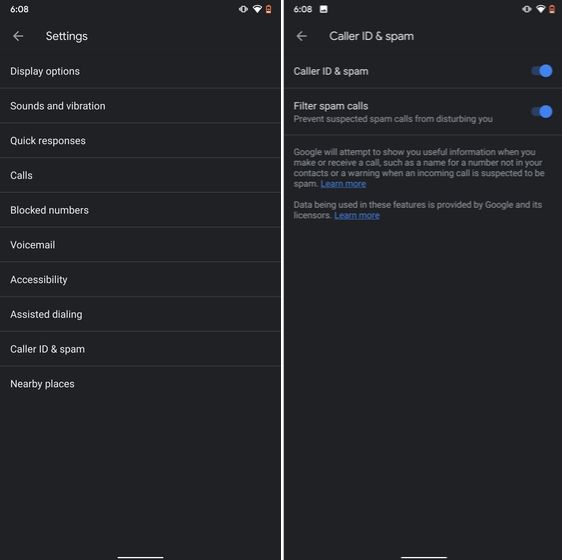
1. Block Spam Calls hidden android features

If you are worried that you will miss important calls then fret not. I have been using this feature for a long time and I can vouch that it works flawlessly. While there are other apps like Truecaller with similar features, you should be wary against handing your data to third-party apps, especially given its shady past record.

2. Verification Code Autofill

Many of us have allowed SMS permission to multiple apps for seamless OTP verification. However, this can lead to serious breach as apps can read all your text messages and also build credit profile without your consent. To crack down on this behavior, Google has brought a new API called the SMS Retriever. It allows apps to capture a one-time code without asking for SMS permission. In case, the app developer has not implemented this API, Google will act as a bridge and provide the verification code. That is awesome, right? So to enable this feature, navigate to Settings -> Google -> Verification Code Autofill and enable the toggle. Make sure you have also enabled the Autofill service by Google.
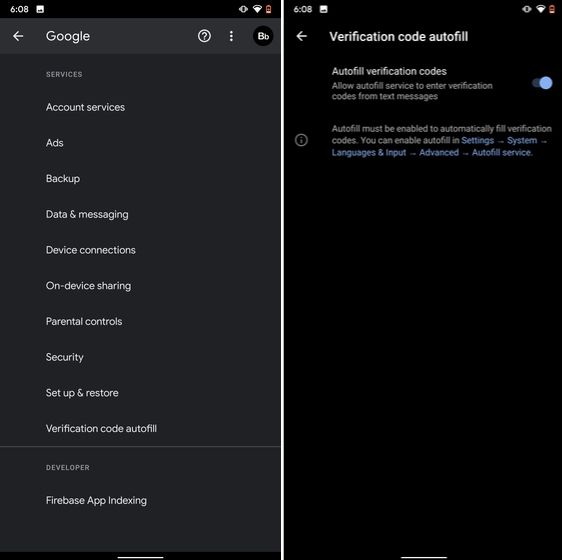
2. Verification Code Autofill

3. Force Dark Mode on all Apps

While the dark mode is slowly becoming the norm, there are still apps like Facebook and WhatsApp which are yet to embrace the dark side. If you want to force dark mode on a range of apps then there is a hidden Android setting that lets you do it. However, you must be on the latest Android 10 build. To enable dark mode for all the apps, navigate to Settings -> About Phone and tap on the Build Number for seven times continuously. A toast notification will show up prompting "Developer Options have been enabled". Now go back, and search for "Override force-dark" in the Settings page. Tap on the first result and then enable the toggle. Just to be sure, restart your device and check if dark mode is working on all apps.
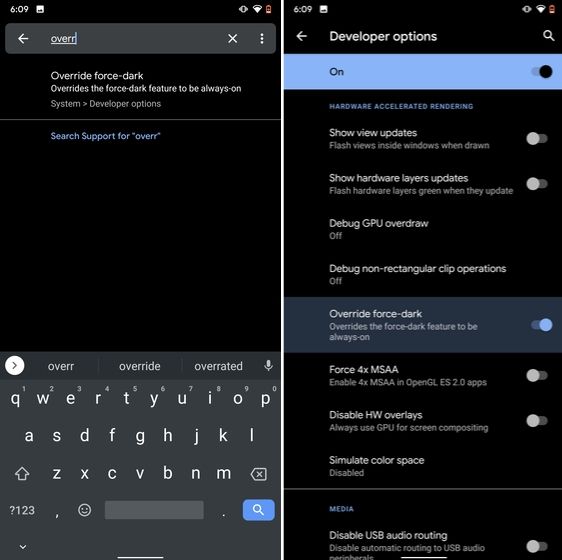
3. Force Dark Mode on all Apps

4. Focus Mode

Google has brought a new feature called Focus Mode to Digital Wellbeing with the launch of Android 10. While Digital Wellbeing is great at limiting the screen time of various apps, Focus Mode allows you to block certain apps completely so you can focus on what you are doing. To configure Focus Mode, follow Settings -> Digital Wellbeing -> Focus Mode. Here, you can select apps that you find distracting and can enable Focus Mode straight from the Quick Settings panel.
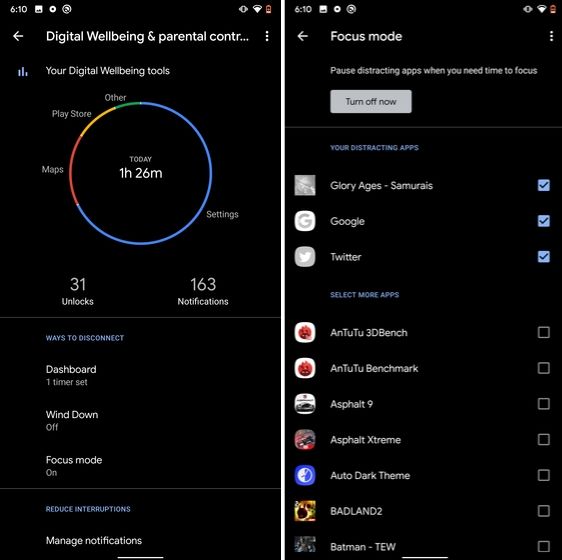
4. Focus Mode hidden android features

5. Share WiFi with QR Code

I know the feeling when someone asks you to share your WiFi's password and you can't seem to remember it. If you use a strong password with multiple hashes and characters then it becomes even more tedious to type it out. In such cases, a QR code can help you seamlessly connect to WiFi networks. Thankfully, Android 10 has this not-so-hidden feature under the WiFi Settings page. Open it and you will find the QR code scanner besides the "Add Network" section. Now, scan the QR code and you will be connected in no time.
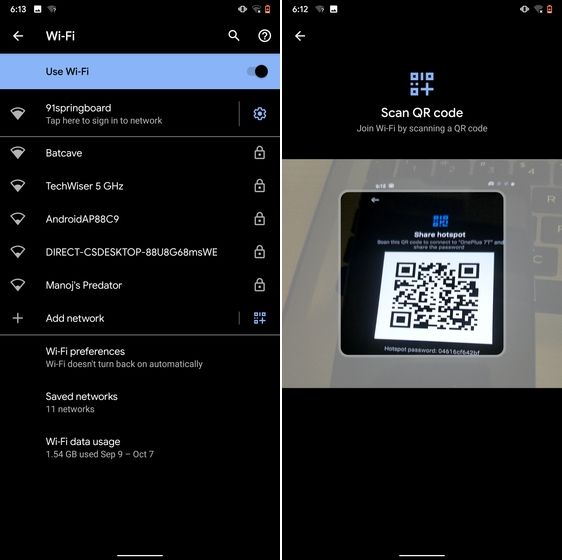
5. Share WiFi with QR Code

6. Randomize MAC Address

MAC address is a unique identifier assigned to WiFi-enabled devices including smartphones. Most devices come with a static MAC which can be exploited and used for tracking user movement. So having a random MAC address reduces the chance of tracking and strengthens your privacy. If you are running Android 10 then you can randomize the MAC address from the WiFi Settings page. Tap on the WiFi that you are connected to and open "Privacy". Here, make sure "Use randomized MAC" is your default pick.
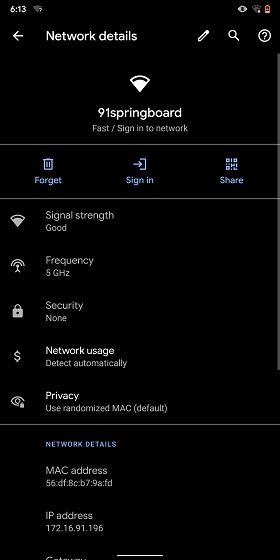
6. Randomize MAC Address

7. Force Apps to Resize in Split Mode

Android has some unique features like Split Mode which make it quite distinct from iOS. It lets you run two apps at once so you can effortlessly multitask between them. However, not all apps support Split Mode and that's where this hidden Android feature comes into play. With this feature, you can force any app to resize in split mode, irrespective of the app compatibility. So to enable this feature, open Settings and search for "resizable". Open the first result and enable "Force activities to be resizable". Now, restart your device and you can enjoy any app in the Split mode.
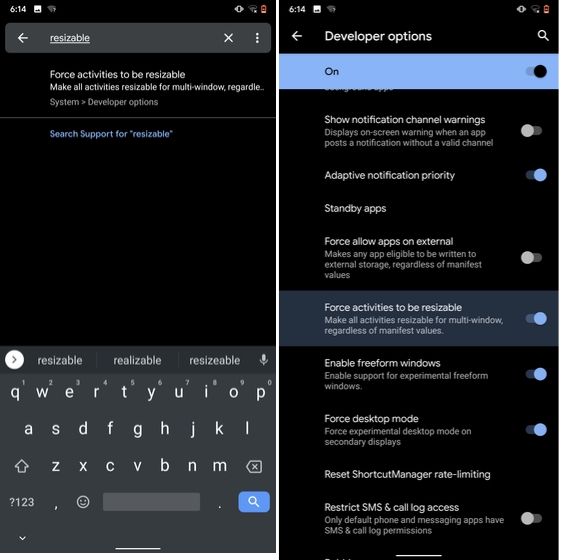
7. Force Apps to Resize in Split Mode

8. Default USB Configuration

If you are someone who regularly connects Android devices to PC then this sneaky feature is going to help you a lot. Android 10 now allows you to choose your default USB configuration. If you transfer files regularly then simply choose the desired settings and you are good to go. To configure USB, open Settings and search for "Default USB" and tap on the first result. Here, choose "File transfer" or any other settings based on your preference.
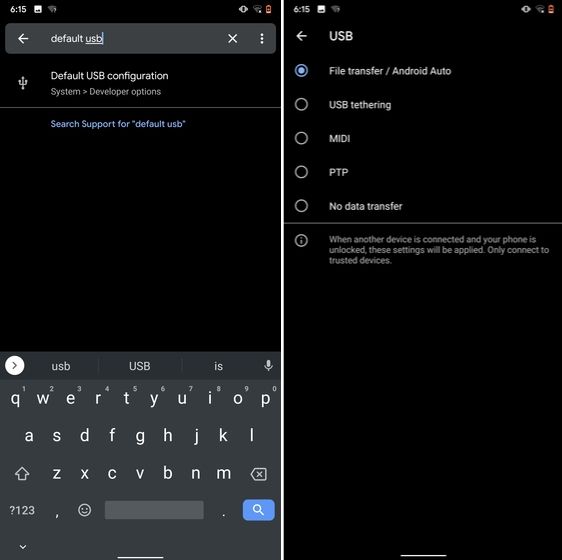
8. Default USB Configuration (2) hidden android features

9. Private DNS

While Private DNS was launched with Android Pie, it still remains one of the least talked features of Android. It allows you to encrypt your DNS query so no one can read it, not even your internet service provider. You can find the Private DNS feature in the "Network and Internet" settings page. Here, open "Private DNS" and choose Automatic for Google's DNS or you can also select some other DNS providers as well. I would recommend you to go with Cloudflare's DNS.
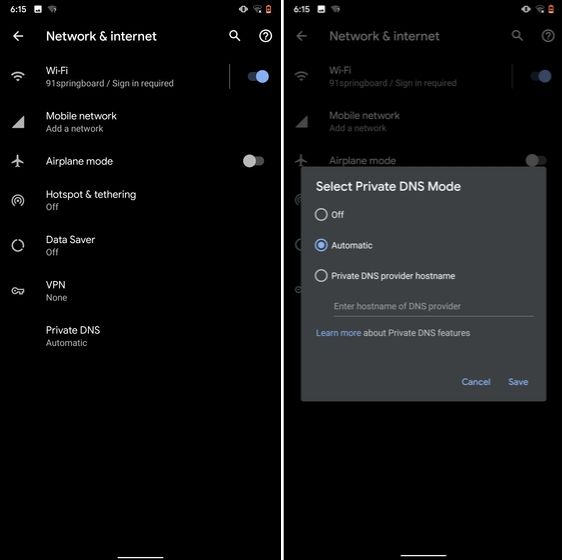
9. Private DNS

10. Device Theming

Device theming has finally arrived on Android, but it's still hidden under the developer options. You can change the accent color, font and icon shape from a handful of options. To find the desired settings page, open Settings and search for "theming". Tap on the top result and customize your Android device as you prefer.
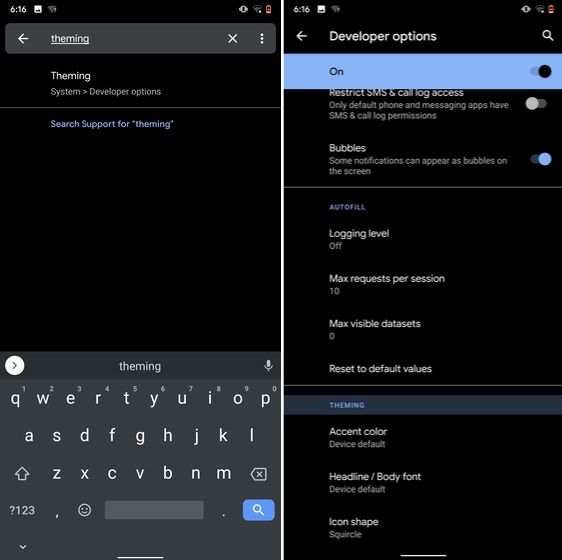
10. Device Theming

11. Show Taps While Screen Recording

With the release of Android Oreo, Google removed the ability to show taps while screen recording for security reasons. However, the settings to configure taps is still available and hidden under the developer options. Just open the Settings page and search for "taps". Open the first result and enable the toggle. Now, you can record your screen with taps and that's really convenient.
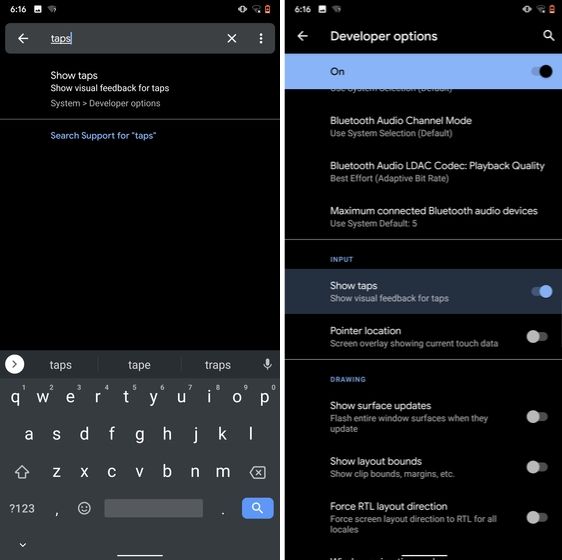
11. Show Taps While Screen Recording hidden android features

12. Capitalize Words Quickly

If you want to capitalize words quickly then Gboard has this nifty feature which is super helpful and I simply love it. Just select the words and tap the "Shift" button twice to capitalize a chunk of words at once. You can also make it lowercase by similarly double tapping the shift button. And if you just want to keep the initials capital then tap the shift button once. That's pretty great, right? So go ahead and type hassle-free with Gboard.

Capitalize Words Quickly

13. Uninstall Multiple Apps

One of the best hidden Android features is that you can uninstall multiple apps at once. It works on older versions of Android as well so that is great. All you have to do is open the Google Play Store and tap on the hamburger menu and select "My apps and games". Here, switch to the "Installed" section and then tap on "Storage". After that, simply select apps that you want to uninstall and hit that "Free Up" button. Voila, multiple apps just got uninstalled in just one tap.

13. Uninstall Multiple Apps

14. Clear Site Storage Using Chrome

Chrome is notorious for accumulating a large amount of data in background which makes the performance worse and also takes up crucial storage space. If you want to check what websites are eating up your memory space then a hidden Chrome setting can help you with that. Open Chrome on your Android device and head over to its Settings page. Now, navigate to Site Settings and open Storage. Here, you will find all the websites with their storage space. Open any website and tap on the "Delete" icon to finally free up your internal storage from unnecessary cached data.
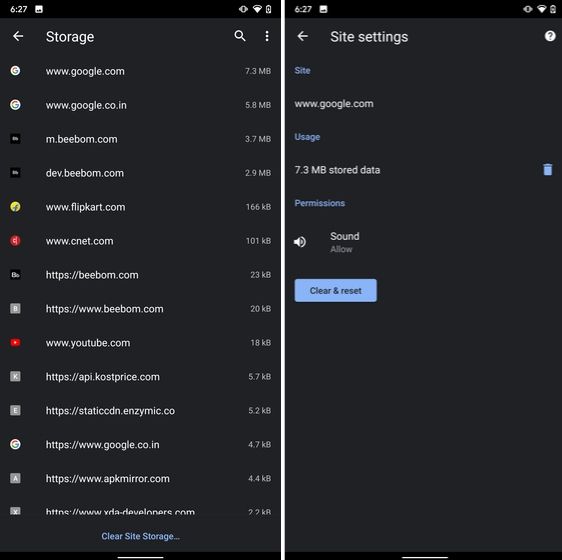
14. Clear Site Storage Using Chrome

15. Street View Layer in Google Maps

Street View is an immersive way to explore places and find new landmarks, hotels, restaurants from anywhere around the world. Now, the Street View Layer has been added to Google Maps and it works pretty well. To check if Street View is available in your region, open Google Maps and tap on the "layer" icon on the top-right corner. Now, tap on "Street View" icon and then zoom out to find blue lines on the map. Finally, tap on the blue lines and Street View will show up for that place. That's cool, right? So go ahead and check out Street View to find some hidden gems around the world.

15. Street View Layer in Google Maps hidden android features

Note: The blue lines show up wherever street view is available.

@EVERYTHING NT

More information

DOWNLOAD COWPATTY WIFI PASSOWORD CRACKING TOOL

COWPATTY WIFI PASSWORD CRACKING TOOL

CoWPAtty is a wifi password cracking tool. Implementation of a dictionary attack against WPA/WPA2 networks using PSK-based authentication (e.g. WPA-Personal). Many enterprise networks deploy PSK-based authentication mechanisms for WPA/WPA2 since it is much easier than establishing the necessary RADIUS, supplicant and certificate authority architecture needed for WPA-Enterprise authentication. Cowpatty can implement an accelerated attack if a precomputed PMK file is available for the SSID that is being assessed. Download coWPAtty wifi password cracking tool.
It's a pre-built tool for Kali Linux which you can find in the /usr/local/bin directory. It's also available for the windows but it doesn't work as fine as it does in the Kali.

DOWNLOAD COWPATTY WIFI PASSWORD CRACKING TOOL

For windows, you can download it from here. As it becomes pre-built in Kali, you do not need to download it. You just have to follow the path /usr/local/bin directory to find it in your Kali Linux OS.

Related news


  1. Hacking Books
  2. Pentesting
  3. Hacker Tools
  4. Pentest Wifi
  5. Pentesting
  6. Hacking Games
  7. Pentest Environment
  8. Pentest Guide

How Do I Get Started With Bug Bounty ?

How do I get started with bug bounty hunting? How do I improve my skills?


These are some simple steps that every bug bounty hunter can use to get started and improve their skills:

Learn to make it; then break it!
A major chunk of the hacker's mindset consists of wanting to learn more. In order to really exploit issues and discover further potential vulnerabilities, hackers are encouraged to learn to build what they are targeting. By doing this, there is a greater likelihood that hacker will understand the component being targeted and where most issues appear. For example, when people ask me how to take over a sub-domain, I make sure they understand the Domain Name System (DNS) first and let them set up their own website to play around attempting to "claim" that domain.

Read books. Lots of books.
One way to get better is by reading fellow hunters' and hackers' write-ups. Follow /r/netsec and Twitter for fantastic write-ups ranging from a variety of security-related topics that will not only motivate you but help you improve. For a list of good books to read, please refer to "What books should I read?".

Join discussions and ask questions.
As you may be aware, the information security community is full of interesting discussions ranging from breaches to surveillance, and further. The bug bounty community consists of hunters, security analysts, and platform staff helping one and another get better at what they do. There are two very popular bug bounty forums: Bug Bounty Forum and Bug Bounty World.

Participate in open source projects; learn to code.
Go to https://github.com/explore or https://gitlab.com/explore/projects and pick a project to contribute to. By doing so you will improve your general coding and communication skills. On top of that, read https://learnpythonthehardway.org/ and https://linuxjourney.com/.

Help others. If you can teach it, you have mastered it.
Once you discover something new and believe others would benefit from learning about your discovery, publish a write-up about it. Not only will you help others, you will learn to really master the topic because you can actually explain it properly.

Smile when you get feedback and use it to your advantage.
The bug bounty community is full of people wanting to help others so do not be surprised if someone gives you some constructive feedback about your work. Learn from your mistakes and in doing so use it to your advantage. I have a little physical notebook where I keep track of the little things that I learnt during the day and the feedback that people gave me.


Learn to approach a target.
The first step when approaching a target is always going to be reconnaissance — preliminary gathering of information about the target. If the target is a web application, start by browsing around like a normal user and get to know the website's purpose. Then you can start enumerating endpoints such as sub-domains, ports and web paths.

A woodsman was once asked, "What would you do if you had just five minutes to chop down a tree?" He answered, "I would spend the first two and a half minutes sharpening my axe."
As you progress, you will start to notice patterns and find yourself refining your hunting methodology. You will probably also start automating a lot of the repetitive tasks.

Related articles


Thank You To Volunteers And Board Members That Worked BlackHat Booth 2019

The OWASP Foundation would like to thank the OWASP Las Vegas Chapter Volunteers for taking the time out of their busy schedule to give back and volunteer to work the booth at BlackHat 2019.  It was great meeting our Las Vegas OWASP members and working with Jorge, Carmi, Dave, and Nancy.  
Also, take a moment to thank Global Board Members Martin Knobloch, Owen Pendlebury, and Gary Robinson for also working the booth and speaking with individuals and groups to answer questions on projects and suggestions on the use of our tools to address their work problems.
OWASP can not exist without support from our members.  

More information


  1. Hacking Resources
  2. Pentest Distro
  3. Pentest +
  4. Pentest Lab Setup
  5. Hacking Gif
  6. Pentest Documentation
  7. Hacking Tutorials
  8. Pentest Cheat Sheet
  9. Hacking For Dummies
  10. Hackerrank
  11. Hacking Programs
  12. Pentest Wordpress
  13. Pentest Practice Sites
  14. Pentest
  15. Pentest News
  16. Pentest +
  17. Pentest Ios
  18. Pentest News
  19. Pentest Process
  20. Pentest Framework

quarta-feira, 10 de junho de 2020

Nipe - A Script To Make TOR Network Your Default Gateway


Tor enables users to surf the Internet, chat and send instant messages anonymously, and is used by a wide variety of people for both Licit and Illicit purposes. Tor has, for example, been used by criminals enterprises, Hacktivism groups, and law enforcement agencies at cross purposes, sometimes simultaneously.

Nipe is a Script to make Tor Network your Default Gateway.

This Perl Script enables you to directly route all your traffic from your computer to the Tor Network through which you can surf the Internet Anonymously without having to worry about being tracked or traced back.

Download and install:
    git clone https://github.com/GouveaHeitor/nipe
cd nipe
cpan install Switch JSON LWP::UserAgent

Commands:
    COMMAND          FUNCTION
install Install dependencies
start Start routing
stop Stop routing
restart Restart the Nipe process
status See status

Examples:

perl nipe.pl install
perl nipe.pl start
perl nipe.pl stop
perl nipe.pl restart
perl nipe.pl status

Bugs

Related posts


  1. Pentest Basics
  2. Hacking Games Online
  3. Pentest Kit
  4. Pentest Web Application
  5. Hacker Box
  6. Pentestlab
  7. Hacker Google
  8. Hacker Videos
  9. Pentest Smtp
  10. How To Pentest A Website With Kali

$$$ Bug Bounty $$$

What is Bug Bounty ?


A bug bounty program, also called a vulnerability rewards program (VRP), is a crowdsourcing initiative that rewards individuals for discovering and reporting software bugs. Bug bounty programs are often initiated to supplement internal code audits and penetration tests as part of an organization's vulnerability management strategy.


Many software vendors and websites run bug bounty programs, paying out cash rewards to software security researchers and white hat hackers who report software vulnerabilities that have the potential to be exploited. Bug reports must document enough information for for the organization offering the bounty to be able to reproduce the vulnerability. Typically, payment amounts are commensurate with the size of the organization, the difficulty in hacking the system and how much impact on users a bug might have.


Mozilla paid out a $3,000 flat rate bounty for bugs that fit its criteria, while Facebook has given out as much as $20,000 for a single bug report. Google paid Chrome operating system bug reporters a combined $700,000 in 2012 and Microsoft paid UK researcher James Forshaw $100,000 for an attack vulnerability in Windows 8.1.  In 2016, Apple announced rewards that max out at $200,000 for a flaw in the iOS secure boot firmware components and up to $50,000 for execution of arbitrary code with kernel privileges or unauthorized iCloud access.


While the use of ethical hackers to find bugs can be very effective, such programs can also be controversial. To limit potential risk, some organizations are offering closed bug bounty programs that require an invitation. Apple, for example, has limited bug bounty participation to few dozen researchers.
Related links

$$$ Bug Bounty $$$

What is Bug Bounty ?


A bug bounty program, also called a vulnerability rewards program (VRP), is a crowdsourcing initiative that rewards individuals for discovering and reporting software bugs. Bug bounty programs are often initiated to supplement internal code audits and penetration tests as part of an organization's vulnerability management strategy.


Many software vendors and websites run bug bounty programs, paying out cash rewards to software security researchers and white hat hackers who report software vulnerabilities that have the potential to be exploited. Bug reports must document enough information for for the organization offering the bounty to be able to reproduce the vulnerability. Typically, payment amounts are commensurate with the size of the organization, the difficulty in hacking the system and how much impact on users a bug might have.


Mozilla paid out a $3,000 flat rate bounty for bugs that fit its criteria, while Facebook has given out as much as $20,000 for a single bug report. Google paid Chrome operating system bug reporters a combined $700,000 in 2012 and Microsoft paid UK researcher James Forshaw $100,000 for an attack vulnerability in Windows 8.1.  In 2016, Apple announced rewards that max out at $200,000 for a flaw in the iOS secure boot firmware components and up to $50,000 for execution of arbitrary code with kernel privileges or unauthorized iCloud access.


While the use of ethical hackers to find bugs can be very effective, such programs can also be controversial. To limit potential risk, some organizations are offering closed bug bounty programs that require an invitation. Apple, for example, has limited bug bounty participation to few dozen researchers.
Related posts

Kali Linux VM Installation And Setup

Preface

From time to time I realize that certain tasks that are trivial for me are not necessarily easy for others, especially if they are just getting started with IT security stuff.

As I am going to be a Facilitator at SANS Munich 2015 on SEC 401, plus we have a few people at work who are just dipping their toe into the wonderful world of Kali Linux, it seemed like a good opportunity to make a short getting started / installation guide on the Kali VMWare VMs that you can download and quickly get started.

On top of that, when I check the statistics of the blog, I always see that the most popular posts are the detailed howtos and tutorials and I assume that it is because there is a need for this kind of posts too, so here it goes! :)


Step -1: Check in your BIOS/UEFI if virtualization is enabled

We are going to use virtualization, so it would be nice to enable it, right?

In BIOS/UEFI menus this is somewhere around "Security" and/or "Virtualization" and it is something like "Intel (R) Virtualization Technology" and "Intel (R) VT-d Feature" that needs to be set to "Enabled".


Step 0: Install VMWare Player or VMWare Workstation

The Kali Linux VMs are VMWare-based, so you need to install VMWare Player (free), VMWare Workstation (paid) or VMWare Fusion (paid, for OS-X).

The more desirable choice is to use VMWare Workstation or VMWare Fusion, as they have a Snapshot feature, while with VMWare Player, you are forced to take a full copy in order to have a sort of rollback feature.


Step 1: Download Kali VM

We need to download the Kali VMs from the "Custom Kali Images" download site, where you can find a 64 bit (amd64) and a 32 bit PAE (i686) too.

There are also Torrent files for the images and based on experience, using Torrent is much more faster and reliable than the HTTP download, so if you can, use that!

Once you have downloaded the VMs, do not forget to check their SHA1 hash!!! On Linux, you can simply use the sha1sum command at a terminal. For Windows, you can use something like the MD5 & SHA Checksum Utility.


Step 2: Change Kali VM default root password

The Kali VM comes with a preset root password, which is "toor" (without the quotes), therefore, it has to be changed.

Here is how you do it:
root@kali:~# passwd
Enter new UNIX password:
Retype new UNIX password:
passwd: password updated successfully


Step 3: Change Kali VM default SSH keys

The Kali VM also comes with SSH preinstalled, so we need to change the SSH keys to avoid SSH MiTM attacks.
Here is how you do it:
root@kali:~# cd /etc/ssh/
root@kali:/etc/ssh# mkdir default_kali_keys
root@kali:/etc/ssh# mv ssh_host_* default_kali_keys/
root@kali:/etc/ssh# dpkg-reconfigure openssh-server
Creating SSH2 RSA key; this may take some time ...
Creating SSH2 DSA key; this may take some time ...
Creating SSH2 ECDSA key; this may take some time ...
insserv: warning: current start runlevel(s) (empty) of script `ssh' overrides LSB defaults (2 3 4 5).
insserv: warning: current stop runlevel(s) (2 3 4 5) of script `ssh' overrides LSB defaults (empty).

Now we can check if the keys are really changed:

root@kali:/etc/ssh# md5sum /etc/ssh/*key*
md5sum: /etc/ssh/default_kali_keys: Is a directory
6abe210732068fa7ca95854c3078dba5 /etc/ssh/ssh_host_dsa_key
1b5f3c1a1b5c48cc3cce31b116e8b6f8 /etc/ssh/ssh_host_dsa_key.pub
8f0f60855e5ab8cac8103d64faab090f /etc/ssh/ssh_host_ecdsa_key
aace49ae9236815c9a1672f8ecb2b1e2 /etc/ssh/ssh_host_ecdsa_key.pub
cf861a9f743fb4584ab246024465ddf1 /etc/ssh/ssh_host_rsa_key
d5d65d8ad023a6cb1418ae05007bc6d3 /etc/ssh/ssh_host_rsa_key.pub
root@kali:/etc/ssh# md5sum /etc/ssh/default_kali_keys/*key*
c8d5b82320a4ddde59d0e2b6d9aad42a /etc/ssh/default_kali_keys/ssh_host_dsa_key
6b12ddecd463677cde8097e23d0f219a /etc/ssh/default_kali_keys/ssh_host_dsa_key.pub
fecf056571a3dfbf3635fc2c50bf23c5 /etc/ssh/default_kali_keys/ssh_host_ecdsa_key
e44b7c50635de42e89b3297414f5047d /etc/ssh/default_kali_keys/ssh_host_ecdsa_key.pub
e9e0267484e020878e00a9360b77d845 /etc/ssh/default_kali_keys/ssh_host_rsa_key
ceee93d7bbc9f9b9706e18f23d4e81f1 /etc/ssh/default_kali_keys/ssh_host_rsa_key.pub

Step 4: Update Kali VM

Next you need to update your Kali VM so that everything is patched.

Here is how you do it:

root@kali:~# apt-get update
Get 1 http://http.kali.org kali Release.gpg [836 B]
Get:2 http://security.kali.org kali/updates Release.gpg [836 B]
********************************* SNIP *********************************
Fetched 16.7 MB in 14s (1,190 kB/s)
Reading package lists... Done
root@kali:~# apt-get upgrade
eading package lists... Done
Building dependency tree
Reading state information... Done
The following packages have been kept back:
********************************* SNIP *********************************
The following packages will be upgraded:
********************************* SNIP *********************************
241 upgraded, 0 newly installed, 0 to remove and 16 not upgraded.
Need to get 740 MB of archives.
After this operation, 130 MB disk space will be freed.
Do you want to continue [Y/n]? Y
Get:1 http://security.kali.org/kali-security/ kali/updates/main libc6-i386 amd64 2.13-38+deb7u7 [4,044 kB]
Get:2 http://http.kali.org/kali/ kali/main base-files amd64 1:1.1.0 [77.5 kB]
********************************* SNIP *********************************
root@kali:~#


Step 5: Create a Snapshot/Copy the VM

Once you are done with all the above, you can make a Snapshot in case of VMWare Workstation or copy the files of the VM in case of VMWare Player, so that you can roll back to this clean stat in case you misconfigure something.

Hope this was helpful. Happy hacking!


More information
  1. Pentest With Kali Linux
  2. Pentest Meaning
  3. Pentest Methodology
  4. Hacker Website
  5. Hacking Hardware
  6. Hacking Online Games
  7. Hacker Forum
  8. Pentest Cyber Security
  9. Pentester Academy
  10. Pentesterlab

terça-feira, 9 de junho de 2020

KPOT Info Stealer Samples


KPOT Stealer is a "stealer" malware that focuses on stealing account information and other data from various software applications and services

References

1.  2020-04-19 Didier Stevens posted analysis of KPOT infostealer on the Infosec Handlers Diary blog "KPOT Analysis: Obtaining the Decrypted KPOT EXE"
These are samples to follow his analysis routine.

2. 2019-05-09 Proofpoint. New KPOT v2.0 stealer brings zero persistence and in-memory features to silently steal credentials


Download

             Other malware


Download. Email me if you need the password (see in my profile)


Hashes

1. From Didier Stevens' post

MD5  56ad7b243511ee7398d43df7643dc904
SHA-1  ae5ab7798ca267b1265a0496c562f219821d17cf
SHA-256  3fd4aa339bdfee23684ff495d884aa842165e61af85fd09411abfd64b9780146

2. From Proofpoint

MD5 7d7667ddce8fd69a0fd50bb08c287d10
SHA-1 087fc3e9a082983ee6a2b25f0ccb09eb723e0f39

SHA-256 67f8302a2fd28d15f62d6d20d748bfe350334e5353cbdef112bd1f8231b5599d

MD5 45ddc687f88b45fc3fec79f9dc8b38e2
SHA-1 de37b748e0e32d96c31f469f9ba4ea4f11e3e78b
SHA-256 36dcd40aee6a42b8733ec3390501502824f570a23640c2c78a788805164f77cecontagio.deependresearch.org/crime/kpotstealer(proofpoint)_win_samp.zip

More articles


  1. Pentest With Kali
  2. Pentest Network
  3. Hacking Jailbreak
  4. Pentest Open Source
  5. Pentester Academy
  6. Hacking Books
  7. Hacker Website
  8. Pentest Red Team
  9. Pentest Questions

segunda-feira, 8 de junho de 2020

CORS Misconfigurations On A Large Scale

Inspired by James Kettle's great OWASP AppSec Europe talk on CORS misconfigurations, we decided to fiddle around with CORS security issues a bit. We were curious how many websites out there are actually vulnerable because of dynamically generated or misconfigured CORS headers.

The issue: CORS misconfiguration

Cross-Origin Resource Sharing (CORS) is a technique to punch holes into the Same-Origin Policy (SOP) – on purpose. It enables web servers to explicitly allow cross-site access to a certain resource by returning an Access-Control-Allow-Origin (ACAO) header. Sometimes, the value is even dynamically generated based on user-input such as the Origin header send by the browser. If misconfigured, an unintended website can access the resource. Furthermore, if the Access-Control-Allow-Credentials (ACAC) server header is set, an attacker can potentially leak sensitive information from a logged in user – which is almost as bad as XSS on the actual website. Below is a list of CORS misconfigurations which can potentially be exploited. For more technical details on the issues read the this fine blogpost.

Misconfiguation Description
Developer backdoorInsecure developer/debug origins like JSFiddler CodePen are allowed to access the resource
Origin reflectionThe origin is simply echoed in ACAO header, any site is allowed to access the resource
Null misconfigurationAny site is allowed access by forcing the null origin via a sandboxed iframe
Pre-domain wildcardnotdomain.com is allowed access, which can simply be registered by the attacker
Post-domain wildcarddomain.com.evil.com is allowed access, can be simply be set up by the attacker
Subdomains allowedsub.domain.com allowed access, exploitable if the attacker finds XSS in any subdomain
Non-SSL sites allowedAn HTTP origin is allowed access to a HTTPS resource, allows MitM to break encryption
Invalid CORS headerWrong use of wildcard or multiple origins,not a security problem but should be fixed

The tool: CORStest

Testing for such vulnerabilities can easily be done with curl(1). To support some more options like, for example, parallelization we wrote CORStest, a simple Python based CORS misconfiguration checker. It takes a text file containing a list of domain names or URLs to check for misconfigurations as input and supports some further options:

usage: corstest.py [arguments] infile

positional arguments:
infile File with domain or URL list

optional arguments:
-h, --help show this help message and exit
-c name=value Send cookie with all requests
-p processes multiprocessing (default: 32)
-s always force ssl/tls requests
-q quiet, allow-credentials only
-v produce a more verbose output

CORStest can detect potential vulnerabilities by sending various Origin request headers and checking for the Access-Control-Allow-Origin response. An example for those of the Alexa top 750 websites which allow credentials for CORS requests is given below.

Evaluation with Alexa top 1 Million websites

To evaluate – on a larger scale – how many sites actually have wide-open CORS configurations we did run CORStest on the Alexa top 1 million sites:

$ git clone https://github.com/RUB-NDS/CORStest.git && cd cors/
$ wget -q http://s3.amazonaws.com/alexa-static/top-1m.csv.zip
$ unzip top-1m.csv.zip
$ awk -F, '{print $2}' top-1m.csv > alexa.txt
$ ./corstest.py alexa.txt

This test took about 14 hours on a decent connection and revealed the following results:

Only 29,514 websites (about 3%) actually supported CORS on their main page (aka. responded with Access-Control-Allow-Origin). Of course, many sites such as Google do only enable CORS headers for certain resources, not directly on their landing page. We could have crawled all websites (including subdomains) and fed the input to CORStest. However, this would have taken a long time and for statistics, our quick & dirty approach should still be fine. Furthermore it must be noted that the test was only performed with GET requests (without any CORS preflight) to the http:// version of websites (with redirects followed). Note that just because a website, for example, reflects the origin header it is not necessarily vulnerable. The context matters; such a configuration can be totally fine for a public sites or API endpoints intended to be accessible by everyone. It can be disastrous for payment sites or social media platforms. Furthermore, to be actually exploitable the Access-Control-Allow-Credentials: true (ACAC) header must be set. Therefore we repeated the test, this time limited to sites that return this header (see CORStest -q flag):

$ ./corstest.py -q alexa.txt

This revealed even worse results - almost half of the websites supporting ACAO and ACAC headers contained a CORS misconfigurations that could be exploited directly by a web attacker (developer backdoor, origin reflection, null misconfig, pre-/post-domain wildcard):

The Impact: SOP/SSL bypass on payment and taxpayer sites

Note that not all tested websites actually were exploitable. Some contained only public data and some others - such as Bitbucket - had CORS enabled for their main page but not for subpages containing user data. Manually testing the sites, we found to be vulnerable:
  • A dozen of online banking, bitcoin and other payment sites; one of them allowed us to create a test account so we were able to write proof-of-concept code which could actually have been used to steal money
  • Hundred of online shops/e-commerce sites and a bunch of hotel/flight booking sites
  • Various social networks and misc sites which allow users to log in and communicate
  • One US state's tax filing website (however, this one was exploitable by a MitM only)
We informed all sites we manually tested and found to be vulnerable. A simple exploit code example when logged into a website with CORS origin reflection is given below.


The Reason: Copy & Paste and broken frameworks

We were further interested in reasons for CORS misconfigurations. Particularly we wanted to learn if there is a correlation between applied technology and misconfiguration. Therefore we used WhatWeb to fingerprint the web technologies for all vulnerable sites. CORS is usually enabled either directly in the HTTP server configuration or by the web application/framework. While we could not identify a single major cause for CORS misconfigurations, we found various potential reasons. A majority of dangerous Access-Control-* headers had probably been introduced by developers, others however are based on bugs and bad practices in some products. Insights follow:
  • Various websites return invalid CORS headers; besides wrong use of wildcards such as *.domain.com, ACAO headers which contain multiple origins can often be found; Other examples of invalid - but quite creative - ACAO values we observed are: self, true, false, undefined, None, 0, (null), domain, origin, SAMEORIGIN
  • Rack::Cors, the de facto standard library to enable CORS for Ruby on Rails maps origins '' or origins '*' into reflecting arbitrary origins; this is dangerous, because developers would think that '' allows nothing and '*' behaves according to the spec: mostly harmless because it cannot be used to make to make 'credentialed' requests; this config error leads to origin reflection with ACAC headers on about a hundred of the tested and vulnerable websites
  • A majority of websites which allow a http origin to CORS access a https resource are run on IIS; this seems to be no bug in IIS itself but rather caused by bad advises found on the Internet
  • nginx is the winner when it comes serving websites with origin reflections; again, this is not an issue of nginx but of dangerous configs copied from "Stackoverflow; same problem for Phusion Passenger
  • The null ACAO value may be based on programming languages that simply return null if no value is given (we haven't found any specific framework though); another explanation is that 'CORS in Action', a popular book on CORS, contains various examples with code such as var originWhitelist = ['null', ...], which could be misinterpreted by developers as safe
  • If CORS is enabled in the crVCL PHP Framework, it adds ACAC and ACAO headers for a configured domain. Unfortunatelly, it also introduces a post-domain and pre-subdomain wildcard vulnerability: sub.domain.com.evil.com
  • All sites that are based on "Solo Build It!" (scam?) respond with: Access-Control-Allow-Origin: http://sbiapps.sitesell.com
  • Some sites have :// or // as fixed ACAO values. How should browsers deal with this? Inconsistent at least! Firefox, Chrome, Safari and Opera allow arbitrary origins while IE and Edge deny all origins.

More information


domingo, 7 de junho de 2020

Sslmerge - Tool To Help You Build A Valid SSL Certificate Chain From The Root Certificate To The End-User Certificate


Is an open source tool to help you build a valid SSL certificate chain from the root certificate to the end-user certificate. Also can help you fix the incomplete certificate chain and download all missing CA certificates.

How To Use
It's simple:
# Clone this repository
git clone https://github.com/trimstray/sslmerge

# Go into the repository
cd sslmerge

# Install
./setup.sh install

# Run the app
sslmerge -i /data/certs -o /data/certs/chain.crt
  • symlink to bin/sslmerge is placed in /usr/local/bin
  • man page is placed in /usr/local/man/man8

Parameters
Provides the following options:
  Usage:
sslmerge <option|long-option>

Examples:
sslmerge --in Root.crt --in Intermediate1.crt --in Server.crt --out bundle_chain_certs.crt
sslmerge --in /tmp/certs --out bundle_chain_certs.crt --with-root
sslmerge -i Server.crt -o bundle_chain_certs.crt

Options:
--help show this message
--debug displays information on the screen (debug mode)
-i, --in add certificates to merge (certificate file, multiple files or directory with ssl certificates)
-o, --out saves the result (chain) to file
--with-root add root certificate to the certificate chain

How it works
Let's start with ssllabs certificate chain. They are delivered together with the sslmerge and can be found in the example/ssllabs.com directory which additionally contains the all directory (containing all the certificates needed to assemble the chain) and the server_certificate directory (containing only the server certificate).
The correct chain for the ssllabs.com domain (the result of the openssl command):
Certificate chain
0 s:/C=US/ST=California/L=Redwood City/O=Qualys, Inc./CN=ssllabs.com
i:/C=US/O=Entrust, Inc./OU=See www.entrust.net/legal-terms/OU=(c) 2012 Entrust, Inc. - for authorized use only/CN=Entrust Certification Authority - L1K
1 s:/C=US/O=Entrust, Inc./OU=See www.entrust.net/legal-terms/OU=(c) 2012 Entrust, Inc. - for authorized use only/CN=Entrust Certification Authority - L1K
i:/C=US/O=Entrust, Inc./OU=See www.entrust.net/legal-terms/OU=(c) 2009 Entrust, Inc. - for authorized use only/CN=Entrust Root Certification Authority - G2
2 s:/C=US/O=Entrust, Inc./OU=See www.entrust.net/legal-terms/OU=(c) 2009 Entrust, Inc. - for authorized use only/CN=Entrust Root Certification Authority - G2
i:/C=US/O=Entrust, Inc./OU=www.entrust.net/CPS is incorporated by reference/OU=(c) 2006 Entrust, Inc./CN=Entrust Root Certification Authority
The above code presents a full chain consisting of:
  • Identity Certificate (Server Certificate)
    issued for ssllabs.com by Entrust Certification Authority - L1K
  • Intermediate Certificate
    issued for Entrust Certification Authority - L1K by Entrust Root Certification Authority - G2
  • Intermediate Certificate
    issued for Entrust Root Certification Authority - G2 by Entrust Root Certification Authority
  • Root Certificate (Self-Signed Certificate)
    issued for Entrust Root Certification Authority by Entrust Root Certification Authority

Scenario 1
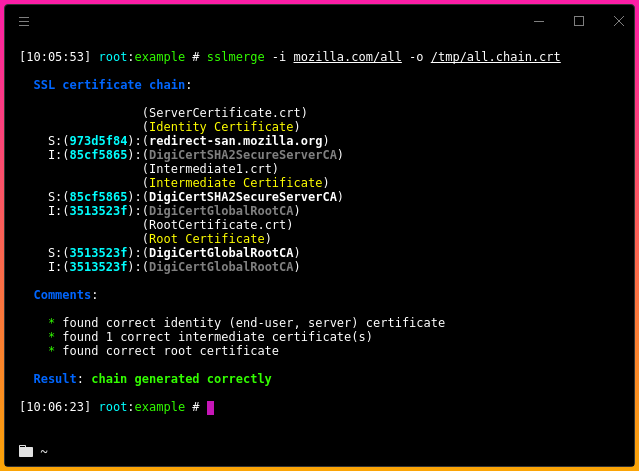
In this scenario, we will chain all delivered certificates. Example of running the tool:

Scenario 2
In this scenario, we only use the server certificate and use it to retrieve the remaining required certificates. Then, as above, we will combine all the provided certificates. Example of running the tool:

Certificate chain
In order to create a valid chain, you must provide the tool with all the necessary certificates. It will be:
  • Server Certificate
  • Intermediate CAs and Root CAs
This is very important because without it you will not be able to determine the beginning and end of the chain.
However, if you look inside the generated chain after generating with sslmerge, you will not find the root certificate there. Why?
Because self-signed root certificates need not/should not be included in web server configuration. They serve no purpose (clients will always ignore them) and they incur a slight performance (latency) penalty because they increase the size of the SSL handshake.
If you want to add a root certificate to the certificate chain, call the utility with the --with-root parameter.

Certification Paths
Sslmerge allows use of two certification paths:

Output comments
When generating the chain of certificates, sslmerge displays comments with information about certificates, including any errors.
Here is a list of all possibilities:

not found identity (end-user, server) certificate
The message is displayed in the absence of a server certificate that is the beginning of the chain. This is a unique case because in this situation the sslmerge ends its operation displaying only this information. The server certificate is the only certificate required to correctly create a chain. Without this certificate, the correct chain will not be created.

found correct identity (end-user, server) certificate
The reverse situation here - message displayed when a valid server certificate is found.

not found first intermediate certificate
This message appears when the first of the two intermediate certificates is not found. This information does not explicitly specify the absence of a second intermediate certificate and on the other hand it allows to determine whether the intermediate certificate to which the server certificate was signed exists. Additionally, it can be displayed if the second intermediate certificate has been delivered.

not found second intermediate certificate
Similar to the above, however, it concerns the second intermediate certificate. However, it is possible to create the chain correctly using the second certification path, e.g. using the first intermediate certificate and replacing the second with the main certificate.

one or more intermediate certificate not found
This message means that one or all of the required intermediate certificates are missing and displayed in the absence of the root certificate.

found 'n' correct intermediate certificate(s)
This message indicates the number of valid intermediate certificates.

not found correct root certificate
The lack of the root certificate is treated as a warning. Of course, when configuring certificates on the server side, it is not recommended to attach a root certificate, but if you create it with the sslmerge, it treats the chain as incomplete displaying information about the incorrect creation of the chain.

an empty CN field was found in one of the certificates
This message does not inform about the error and about the lack of the CN field what can happen with some certificates (look at example/google.com). Common Name field identifies the host name associated with the certificate. There is no requirement in RFC3280 for an Issuer DN to have a CN. Most CAs do include a CN in the Issuer DN, but some don't, such as this Equifax CA.

Requirements
Sslmerge uses external utilities to be installed before running:

Other

Contributing
See this.

Project architecture
See this.


Related news

  1. Pentest Book
  2. Pentest Free
  3. Hacking Meaning
  4. Hacking Programs
  5. Hacker News
  6. Pentestmonkey Sql Injection
  7. Hacking Site
  8. Pentesting And Ethical Hacking
  9. Hacking Jacket
  10. Hacker Software
  11. Pentesting
  12. Hacking
  13. Pentest Meaning
  14. Pentest Practice Sites
  15. Pentest Keys